Storm has been released!
- Article
- 18 Nov 2025
- 9 min read
- 8 min watch time

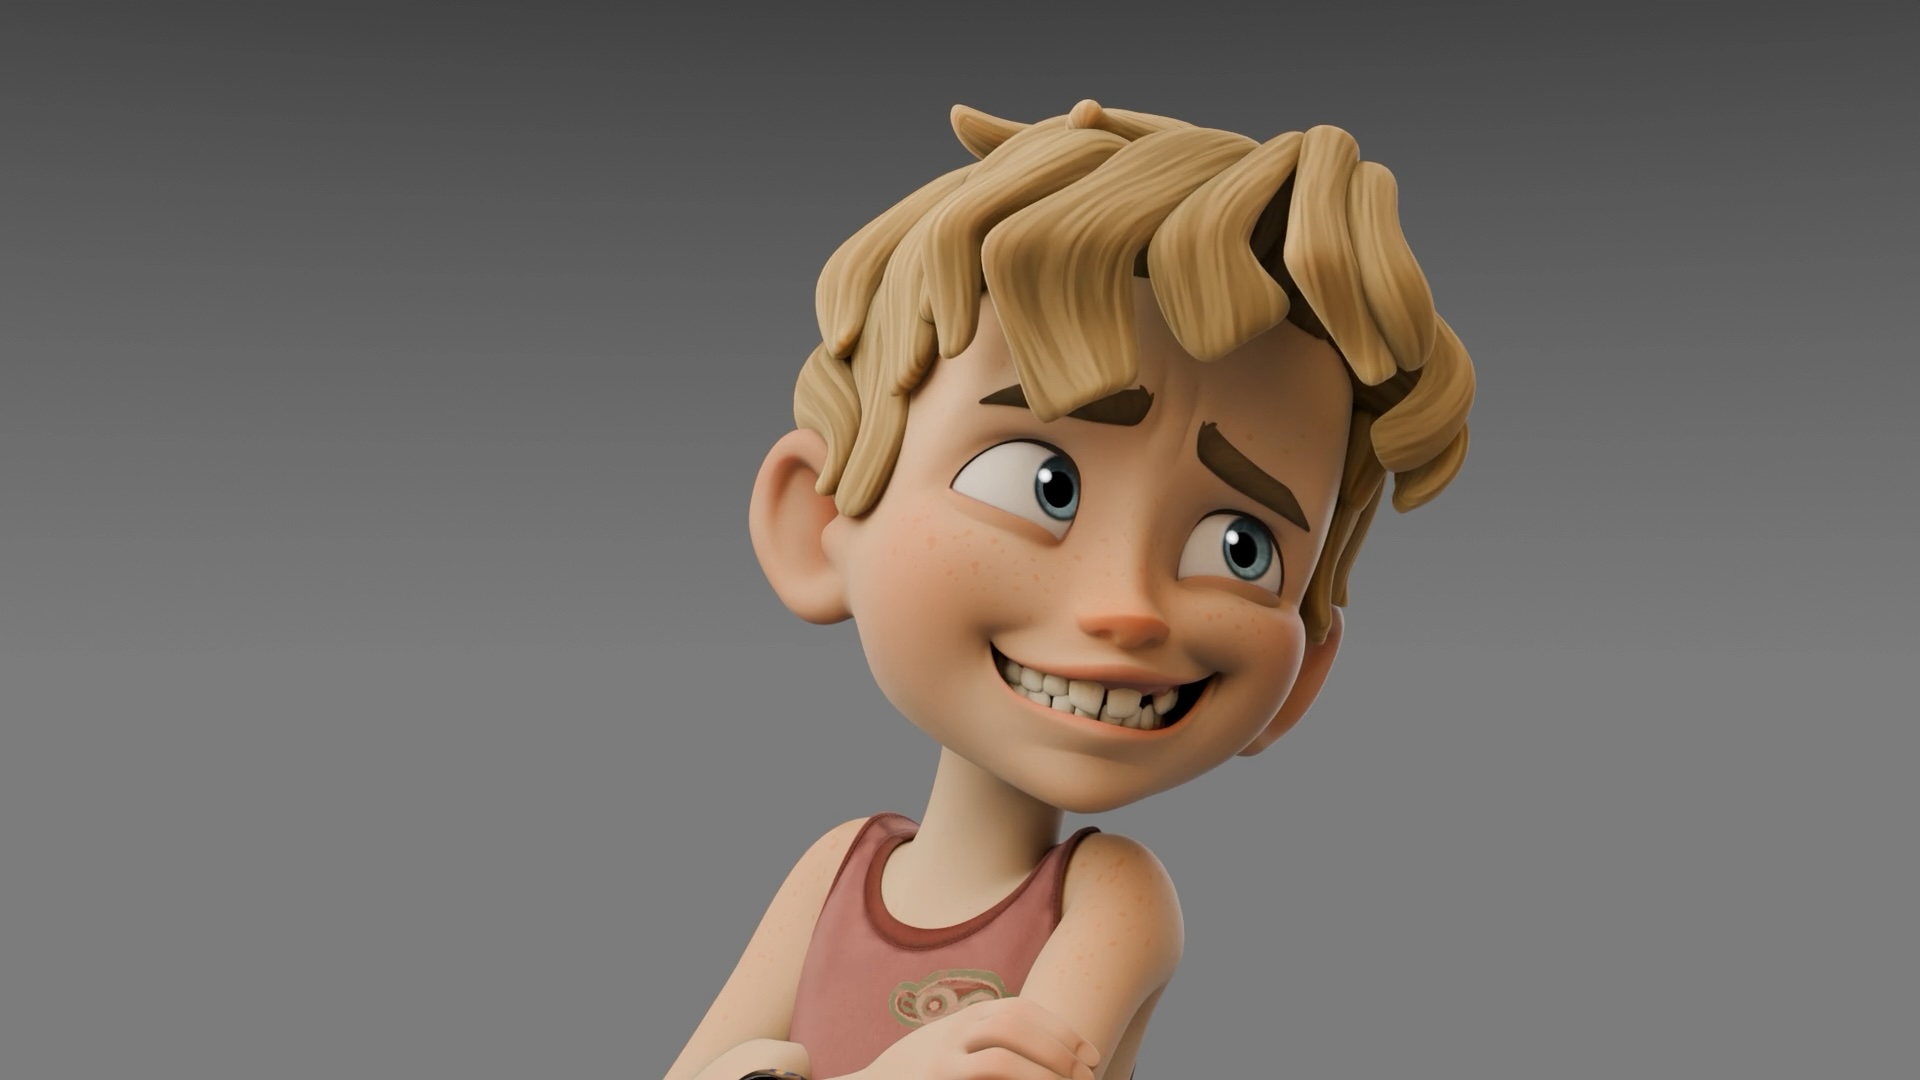
It’s finally here! The new character Storm has been released and is now available for download. Storm is a high quality, ready-to-animate character rig designed for Blender 5.0, packed with a range of exciting new features.
Login to view this content
Join Blender Studio for just €11.50/month and get instant access to all of our training and film assets!
Like the previous characters Rain and Snow, Storm’s body rig was created using CloudRig by Demeter Dzadik, rigging TD at Blender Studio. The facial rig, was crafted by me (Rik Schutte), lead animator at Blender Studio. I used a combination of traditional facial rigging techniques such as shapekeys, ribbon guides, and lattice deformations to build Storm’s expressive and flexible face rig. A poselibrary with facial-, hand- and full body poses are included with the asset download package to kickstart your posing that can be accessed through the asset shelf in the 3d viewport. This setup allows animators to create lively and convincing facial expressions with both precision and ease. To support this facial rigging workflow, the developers at Blender have also introduced several new tools and improvements, which will be explained in more detail throughout this article.
Storm's Body Rig
Storm’s body rig comes packed with all the powerful features of CloudRig. Limbs can be seamlessly switched between FK and IK modes while maintaining their world transformations. Additional options such as Hinge, Parenting, and a wide range of tweak bones give animators the flexibility to shape the body exactly as they need. The feet include all the expected features, such as foot roll functionality, pole vector parenting options, and extra tweak bones for fine-tuning poses.

The spine has received a complete design overhaul. When set to IK mode, the hips now feature both a higher and lower hip control bone, allowing animators to dynamically curve the spine and extend that curvature using these two controls. This provides full control over spine deformation with only a few control bones to achieve the desired shape. In addition, squash and stretch functionality has been added to the spine, which can be easily adjusted through the CloudRig UI panel, giving animators even more creative control.
Storm's Facial Rig
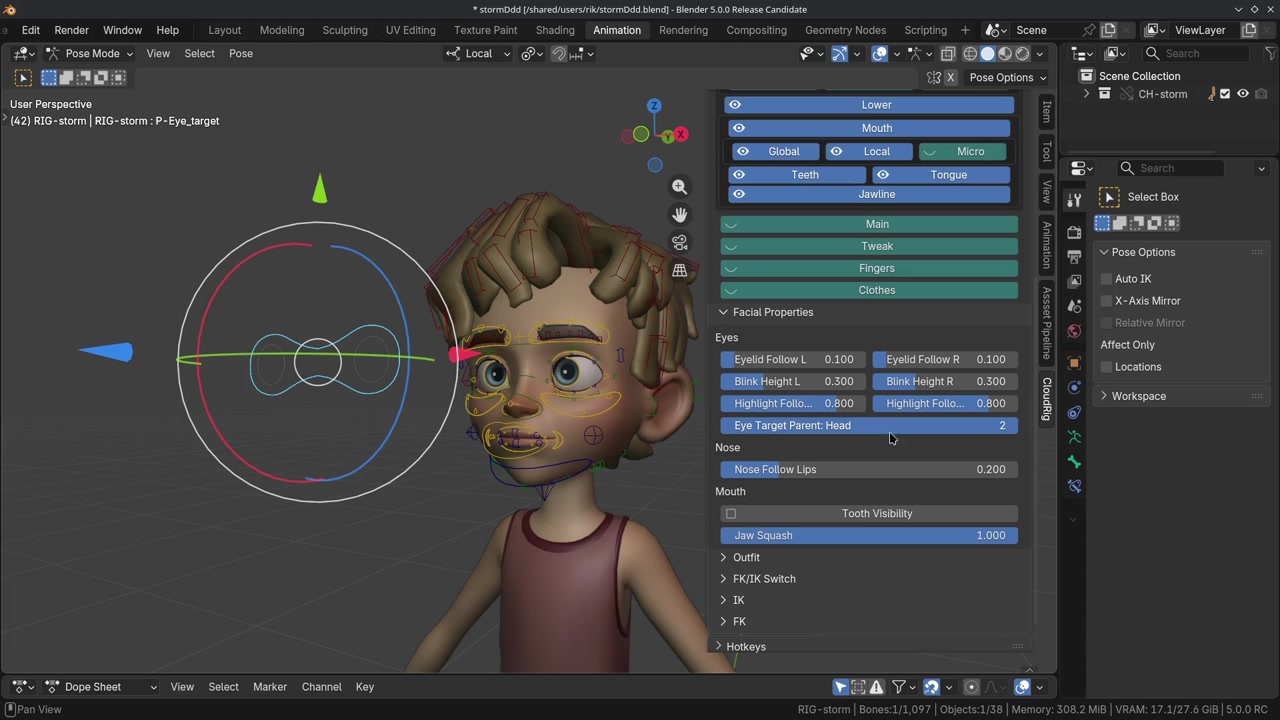
Storm’s facial rig is a custom-built setup created entirely from scratch. This gave Rik Schutte the freedom to experiment and integrate workflows commonly used in professional animation studios. These workflows include ribbon guides, shape key deformations, and lattice deformers. These are all working together to create a flexible and expressive face rig.

A guide ribbon curve in facial rigging is a spline (usually a NURBS curve or a thinned ribbon mesh) that runs along the surface of the face and serves as a deformable “track” to control the precise sliding and stretching behavior of skin in areas like the mouth corners, eyelids, or cheeks. It combines the advantages of a ribbon (two-sided surface for natural skin rolling and volume preservation) with the lightweight control of a curve, allowing animators to drive skin deformation through bones, shape keys, or custom deformers while maintaining smooth tangential motion without unwanted pinching or collapsing. Typically built with a neutral pose, expression offsets, and corrective controls, the guide ribbon curve acts as the primary motion reference that other deformers follow, ensuring clean arcs and accurate surface continuity during extreme facial performances.
This approach lets animators craft clean, appealing shapes without relying on an excessive number of shape keys or complex calculations. The ribbons themselves come with their own specialized features, such as lip zipping and auto-blink functionality, which remain isolated from the facial geometry.
For more complex areas like the brows, a traditional shape key based workflow has been implemented. This system combines multiple shape keys, dividing them into smaller regions for greater precision. After the main shape key deformations, animators can further refine expressions by adjusting local deformation bones that follow the shape key deformations.

Additionally, lattice deformers have been added, giving animators even more control by allowing them to push deformations on top of existing controls. The combination of lattices and shape keys provides a wide and versatile range of expressive possibilities. More in-depth insights into these workflows will be shared in an upcoming facial rigging course, which is planned in the near future.
Blender Studio's Asset Pipeline
To enable multiple artists to collaborate on the same asset, we utilized Blender’s Studio Asset Pipeline. This system allows different aspects of Storm such as modeling, shading and rigging to be worked on simultaneously without interfering with each other’s tasks. For detailed instructions and documentation on the Studio Asset Pipeline, you can find resources here.
Since we divided the rigging work into body and facial components and to make it compatible with the pipeline, we created two separate armature objects. This setup allowed Demeter and me to work on their respective parts concurrently while keeping the tasks clearly separated. At the end of the rigging process, the two armatures were merged into a single object, so animators only need to interact with one armature when creating animations.
Login to view this content
Join Blender Studio for just €11.50/month and get instant access to all of our training and film assets!
Blender Tools and Addons
To successfully implement the facial rigging workflow, Blender Studio and the Blender development team have collaborated to create new functionality and improve existing tools for Blender 5.0.
Shape Key Improvements
Shape keys are a crucial element of this rigging workflow, and they have received significant updates. The new tree-view UI, implemented by Pratik Borhade, allows users to multi-select and adjust shape keys (using Alt) and drag them up or down in the list. These quality-of-life improvements make managing shape keys much easier and more intuitive.
Several new operators have also been added to shape keys by Hans Goudey, including Copy, Update, and New from Objects. These tools simplify the process of managing external shape keys and updating them on the target mesh. The new 'flipped' option applies a shape key to both sides of a symmetrical face mesh, meaning animators only need to create and update one side to affect the other automatically.
Duplicating shape keys is now much simpler thanks to the new Duplicate operator. For a deeper dive into these updates and how to use them, refer to the Blender 5.0 Shape Key documentation.
Pose Shape Key Addon
To ensure deformations remain appealing and true to the character design, we created corrective shape keys based on specific poses. For this, we used Pose Space Deformations (PSD) techniques with the Pose Shape Key Addon, available on Blender’s extension platform.

The addon allows users to pose particular control bones on the character rig and generate a new shape key directly from that pose. Both combination shapes and corrective shapes can be created quickly, with the addon automatically assigning the corresponding bone transforms as drivers for the pose.
With just a few clicks, corrective shapes can be applied to the final face mesh, significantly speeding up the workflow and making PSD implementation much more efficient. For more details, refer to the Pose Shape Key Addon documentation here.
Override Transforms Improvements
As part of the shape key-based rigging setup (in this case for the brows and cheeks), it was essential that control bones accurately follow the face mesh deformations. An efficient way to achieve this is through Override Transforms, which allows control bones to be positioned based on the transforms of other bones. Since this is purely a visual override, it does not interfere with Blender’s dependency graph and avoids creating dependency cycles. Awesome!
While this functionality has existed in Blender for some time, the transform gizmos previously did not update to reflect the evaluated visual position of the overridden bones. They remained at the bones’ original locations. At the request of the Blender Studio team, developers Wayde Moss and Christoph Lendenfeld added the ability for gizmos to update exactly at the visual location of the control bone. This makes working with Override Transforms much more intuitive and precise for animators to select and manipulate facial controls.

Lessons Learned
As I approached the facial rigging for Storm, I looked at it primarily through the lens of an animator. I needed to understand the principles of facial rigging and decide among the many possible approaches for building a face rig. The initial proposal was largely based on shape key-driven deformations, which you can read here. Shape keys allow for highly controlled and designed deformations, but they come with a trade-off: limited flexibility.
Through numerous prototypes for the mouth, eyes, and brows, I discovered that different facial features benefit from different rigging solutions. Late in the R&D process, I decided to use a ribbon technique for both the mouth and eyes and then building corrective shape keys on top. For the brows, I stuck with a more traditional approach, combining shape key deformations with deform bones underneath. This gave solid eyebrow results, though it lacks the ability to scale or rotate local areas which are sometimes necessary to maintain brow volume or preserve smooth curvature.
The ribbon approach used for the lips could also be applied to the brows, with corrective shape keys dictated and driven by the ribbon deformations. That said, exploring these different approaches and experimenting with various rigging techniques was extremely insightful, revealing the strengths and limitations of each method.
So, is Storm’s facial rig entirely shape key-based? Only partially. The brows and cheeks rely on shape keys, while the eyes and mouth are primarily influenced by ribbons, with shape keys still playing a supporting role. In a sense, Storm is a hybrid rig. For the next facial rig, for full flexibility, I would consider using ribbons for the brows as well, combined with corrective shape keys via the Pose Shape Key Addon.
With all that said, I’m very proud of Storm’s facial rig and the range of expressions it allows. I hope you have as much fun exploring and animating Storm as I did. I can’t wait to see the creative animations you bring to life. Enjoy!
12 comments

I’m super interested in this rigging. Any chance you could make a very detailed facial rigging tutorial? I really want to see how the facial rig is done — it’s seriously amazing.
@GlowGamer working on it!

Awesome work Rik & Demeter! I've been itching to see Storm since you previewed it at BCon. Really slick implementation. Can't wait to dive under the hood and see how you did that face rig!

This is just amazing! Any more information about how you merged the facial rig and the body cloud rig?

@Rik Schutte would you be able to release a version with the metarig
and thank you! this is incredible. im trying to figure out how to implement this into all my stuff as fast as possible haha
@tone watson Hey Tone, the metarig should be in the 'rig helpers' collection. Hope that helps!
Looks great! When can we get a tutorial for how you were able to achieve this?
@Jose Podio Hopefully early 2026

Congrats on finishing the Project, Storm's looking incredible! Can't wait to learn more about the workflow behind it all.

Amazing! Downloading now. Thanks!

Awesome! Thanks!
Join to leave a comment.